

From Sawdust to Restoration: Making the most of the pandemic
Written by Volunteer and Member of the Mid-Lakes Rustic Iron Club, Bill Pauwels
What to do during the co-vid year(s)? It was hard for me, like everyone else who likes to do things instead of watching other people do things, to be told that so much of what we enjoy doing was going to be cancelled for 2020 and, as it turned out, beyond in some cases. As it turned out, our group, Mid Lakes Rustic Iron (MLRI), had a project ready to start that had been in the planning stages for a couple of years. Now, “with nothing to do”, the opportunity to put it all together was here.

This all started several years back with the purchase of an American Sawmill Machinery sawmill that was brought back into a family. Sheldon and Rick Krueger of Newton, WI, had the opportunity to purchase back Sheldon’s dad’s, Edwin, sawmill he used in the first half of the 1900’s.
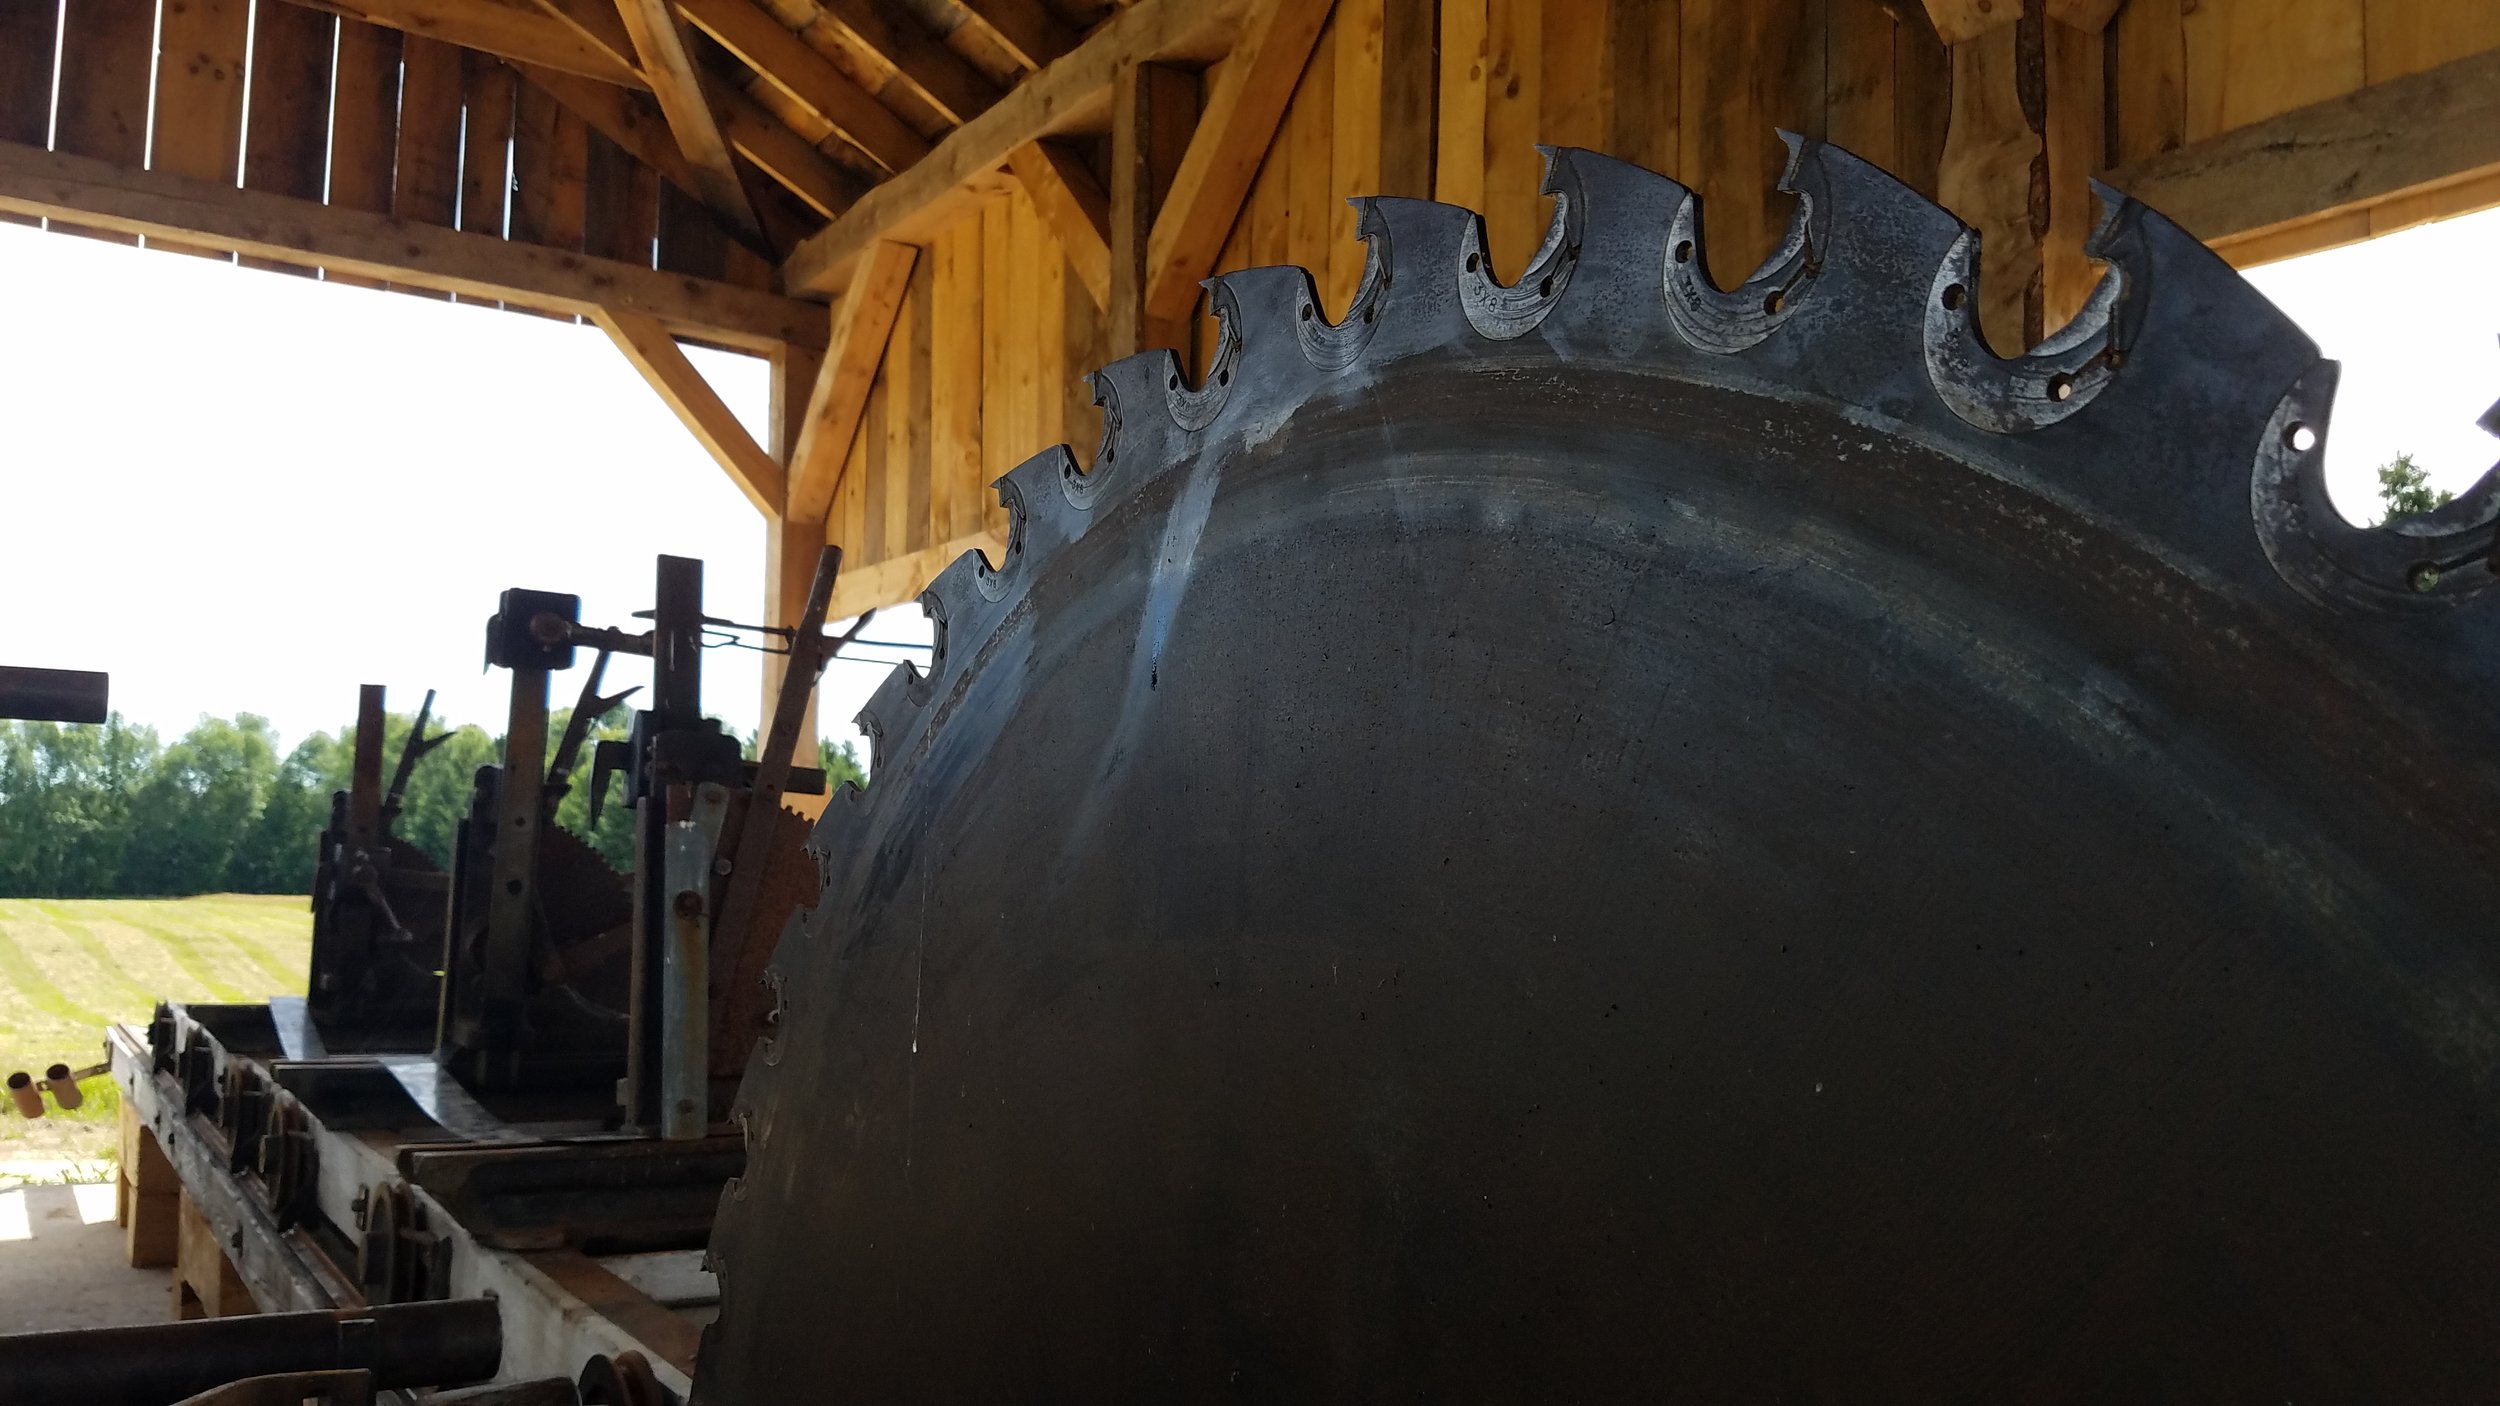
Owned by a local yet, under cover and still seeing some use, it was taken apart and loaded onto a wagon. It had a nice insert tooth blade and an interesting, custom made “centralized” greasing system.
Having sawed in the weather for nearly 20 years, and with more ambitions for the future, putting up a building to cover Edwin’s old mill became a priority for us; not to just protect the mill, but to also have something set up permanently to ease on the labors of running a show and to help solidify our partnership with the Manitowoc County Historical Society (MCHS) our partner for the Mid-Lakes Thresheree, which has been a collaborative effort since 2012.
Being at a living history museum, we decided early on that the building would be made as historically accurate as feasible, yet with some modern amenities. A concrete floor was a must, and a building that was more permanent than what was typically seen during the heyday of logging in central Wisconsin. This included a donated metal roof, a lot of “brokered” logs, and a large amount of donated time and equipment.
A “pole barn” was not the answer…how about a mortise and tenon post and beam building? Plans were drawn up and a bill of materials for a 20 x 50 structure, with 12’ side walls, with functionality and future expansion in mind (had to keep that in mind, as a couple more unique items were given to MLRI as this building was being designed). 8 x 8s and 1” plank siding were sawn on Rick’s mill one day, if I remember right six of us made 3600 bd ft. of lumber in 7 hours. The eight byes were loaded onto a wagon and pulled to my house. The one byes were stickered at the build site, and those were a start, not enough for this project. Two byes for the roof rafters and ridge pole were cut and stacked on left on site (didn’t want to overload my wagon).

I did the bulk of the layout myself, including “male and female” jigs to make sure tenon legs would fit in mortised holes. 45 degree angle braces at every post were incorporated, but we made these a six by six. Once I did the first one out of an 8x, and the prospect of doing 28 more by hand, reducing those to six by sixes allowed us to do these on club member Dick Shavlik’s band saw, after I cut all the shoulders with a circular saw. This saved an incredible amount of time. The building has four primary 12 ft tall x 20 wide frames, all mortise and tenon with oak pegs (that Dick also made). I laid out in the front yard and dimensioned and fit together one frame. Once it was assembled (no pegs), I laid out one roof rafter set until the pitch looked right and had a pattern for 60 rafters (a couple of spares). Once I was happy, this was all disassembled and posts were laid out and all the joints were bored out with a forstner bit, cleaned up with a large router bit with a template, and since the router bit wasn’t long enough, finished off the old fashion way, with a timber framing chisel and a wood mallet.
The 20 foot frame top timbers were left long, as on the first one I did, the timber split since the joiner work was so close to the end of the timber. These would need to be cut off after frames were stood up. The 50 ft frames were lap jointed at two locations, 20ft from each end. This made the laps land on top of a post. We added two additional post on the south “viewing” wall so we’d have decent support to make a 40” tall wall so people could safely watch the mill in operation.
As everything goes, after building all these parts, everything kind of sat on the wagon for a year until final placement of building was made, help was arranged, a roof donated, etc. MCHS paid for the concrete and the slab was poured (with only one loaded cement truck getting buried) with a recess in the center for the saw dust conveyor, in the Fall of 2019. In Spring, construction would begin…and then co-vid hit.
MLR/MCHSI decided we were going to forge ahead with the build. We were always outside, and MCHS was not supposed to open until May…it was so nice out we started in late March. Member Pat Hemken and I led the charge with assembly of the frames, after others with skid steers came and unloaded everything. Angle braces had to fit into their slots as the tops and legs were put together. We very quickly found out our 3 lb dead blow hammers were not up to the task, so Pat quickly made up a “Commander” (check your Eric Sloane books) with a 6 x 6 head and four foot handle. After the first frame, some time was taken to open up a few mortises to help slide things together. The tenons on top of all the posts stick through their top 8 x 8, allowing them to be mortised into the 50’ spliced header timbers. Once all the frames were stood up (several members as well as a skid steer helped with this), they were braced and nailed to the concrete forms (we did not pull forms off as we anticipated doing this) to keep them up. The angle braces for the 50’s were set into the posts and secured with a dry wall screw for the moment. Setting the 3 pc 50 ft timbers in 20’ and 10’ sections wasn’t bad, but it required a guy on a ladder at every post while it was set to get the angle braces in. Members Dick Shavlik, Bill Tess, Mitch Frink and Steve Kress, Ben Rehme and others on and off were all here for this big job.
A true 2 x 12 ridge pole was sawn and put up on legs off the four main frames using a borrowed lift cart…it was built in three sections; and those were plenty heavy to put up. We put up enough rafters to hold everything in place. Once accomplished, the traditional tree branch was nailed to the top of the ridge, an old practice of thanking the forest for its bounty. [picture 4]
To keep the building looking “right”, enough 1” material was sawn to deck the entire roof. You really learn to appreciate a nail gun at this point. Once decked, a couple of braver than I souls had the entire metal roof down in one day. We put 1” siding on the gables, covering up our joinery work to protect it from the elements, but it is all visible from the inside. The south side we put on siding for the viewing wall and above it, as well as high up on the eave end of the north, or loading side of the mill.

Rick and Sheldon Krueger, outside the sawmill in September 2022
At the Thresheree that year were able to have steam power on Sheldon’s dad’s old mill again, and Sheldon was happy to cross it off his bucket list.
In addition to the sawmill, we had three other “new” items. One was a Hercules 300,000 lb capacity cable drum stump puller that was donated by a family when they were clearing out the old home farm. While we didn’t pull stumps with it, we did anchor it a tree, and a single snatch block, my 80 yr old dad and a 60 yr old friend were able to drag a John Deere A with its brakes locked pretty easily. I can see why there are not a lot of these around, as they do not level wind. Once all the cable is out and it’s time to reel it back up, as the horses walk around in a circle, someone (me, in this case) has to lay on their side and help spool the ¾ cable onto the drum. I can’t imagine this with the 500,000 lb machine, with its 1 ¼” cable. Maybe the reason why dynamite replaced them so quickly when introduced.
2020 was the first year we also put our repaired shingle mill to work which was donated to us from the current owners of the former Liermann Sawmill south of Valders, WI. Member Bob Duescher did a preliminary run in ’19, but took it home with him as it needed some babbitt work done to it and the carriage needed help…Liermann was known to run their equipment beyond their useful life and this shingle mill was showing its age. But nowhere near as bad as the other items.
We also received two planer/edgers. One is an unknown make 6 x 24” compact unit with dual edgers, so it can surface plane one face as well as two edges at a time. This unit was froze tight and other than a pair of usable knives, was pretty well shot.
The other planer is much more impressive, if nothing else than its sheer size. It is an O.L. Packard (Milwaukee) with the same capacity as listed above. Primary difference it is 12 feet long with double infeed rollers on the in feed side and all the open gearing a guy wants to make an impressive display. With the super long in feed table, you can really straighten out boards. This was certainly worth getting back into running shape…but it was also kind of “ran into the ground”.
First I needed to get it home. Rick’s New Holland skid steer, with an approx. 4500 lb lift capacity, could just get it off the ground, but not pick it up. Had to call in some bigger iron, so member Jim Wiesner brought his articulated Ford New Holland which easily picked it up and set it on my flat bed.
Getting home and backed up to my loading dock, since we already had it mounted to 4 x 8 wood skids, I thought I’d drag it off with my ’48 John Deere A. Amazing how good wood skids to wood deck stick…I couldn’t budge it. Only after slightly jacking it up and throwing some sand underneath it was I able to get it moving and onto the gravel. Once I got moving, I didn’t stop until I was as far into my shed as I wanted to go…figured I’d never get it moving again (other than my Oil Pull M, the A is my “big” tractor). A little ingenuity and some 2” iron pipe, I was able to slide it over into a spot where I could work on it.

Planer and Shingle Mill
A couple of shafts were stuck, but just loosening up the bearing caps on everything I was able to get everything loose. The shims were all gone on pretty much everything. The time honored “adjustable shim” was all over this thing…a piece of leather belting that you just cranked down tighter when shafts started to jump. I made shim packs for these as well as extras. There is/was enough babbitt left to get everything to decent for now…at least to get it running again.
The edgers were updated at some point…that babbitt was milled out and then some, and a set of John Deere PTO shaft bearings were installed. Was nice, just for once, to be able to go out and buy a reasonably priced set of replacement items for a machine whose parent company no longer exists.
The right side edger is permanently parked, whereas the left side can be moved with a crank for different width boards. That crank was froze hard and its mounting point was shot, both of which took several nights each to fix. When you crank the adjustable belt driven edger over, you must also move its 20” drive pulley. I think these guys were planning/edging 12” wide boards for a long time, as that pulley was extremely stuck with less than an inch between it and the stationary edger’s pulley. A lot of penetrating oil through its set bolt and several hours of pounding dozens of large wood sticks into splinters and a three pound hammer finally got that thing moving.
I salvage the knives off of the smaller machine and had them re-sharpened for $1 an inch, probably the deal of the century for this. The edgers we have a set of ship lap knives, which are pretty ugly, and a couple of shot regular, straight cut knives. Where I work, they were cleaning out a bunch of old shaper knife drawers and ‘lo and behold, some 2” tall knives that I could modify came into my possession. Just to clarify, this planer can edge boards up to 2” thick x 20” wide while surface planning alone it can go 6” x 24”. And, of course, all new belts were made (two edger belts, and two feed drive belts, which work off of a belt tensioning ratchet affair).
With everything was done as I could handle, I belted up to my Farmall H and got her rolling, and it pulled very hard to get moving. I let it idle for ½ hour, constantly replenishing the oil reservoirs that were above every bearing as well as oil holes all over the gear train. It was time to get this thing out of my shop after nearly a year and get it by our club’s barn for a test run.
I never have been one to drag something out of the woods and try to run it for the first time in umpteen years in front of a crowd. Can be very embarrassing or very dangerous. This thing is on the dangerous side. Pat Hemken and I belted up a Farmall Super MTA and first planed a board and then planed and edged one. There are three different drive pulleys of differing diameters for different speeds of cut, not for different tractors, although it can be thought of that way. The faster you spin, the more knife cuts per inch on the board, the smoother the surface, the more you can charge per foot. Since the bearings are not the best, we went for slow and it was amazing how quiet it is. Since all the guarding on the cutter heads were long gone, this was the opportunity to watch it run, see where the shavings flew, and design a guard for it. That was then fabricated by Bob Schowerer, a retired local sheet metal fabricator who has also done work for me on several different threshing machines.
Now, what to do with this thing. I had made a ugly cover for it to protect from the weather, but it is just too heavy to move back and forth to the show grounds, and once it’s set up, it should stay set up. With this and the shingle mill floating around, but with a sawmill now permanently parked, the idea of an addition to our 1 year old sawmill building was on the front burner.
In the summer of 2021, we poured a 16x 31’ slab teeing into our new building. It was cured enough by show time for Jim Weisner to once again load this thing onto my trailer, and to park it where we thought it’d make sense on the slab. We wanted the planer shavings to kind of end up by the sawdust pile from conveyor, to keep the mess a minimum. The shingle mill was parked along the side it, but with its shavings going the opposite direction against what would be a workshop wall. These shavings are saved for the Villages’ blacksmith as well as other local smiths. With decent weather, I ran the planer for the first time in front of the public. A good many comments were made, particularly how you never see one of these running…they are always just sitting in the weeds rusting at other shows. At the end of the show, we made a couple of adjustments as to how everything was parked, and we started fine tuning the design of the addition to our 2 year old sawmill, which during that show, sawed the bulk of the lumber we needed to use to build.
I learned a lot from the first building to the second. Looser joints were needed, and for the size of this building, 6 x 6s, thank heavens, would be plenty heavy enough. Jigs, patterns and more male/female gages. Due to the nature of the equipment we were housing, everything had to be weather-proof when not being used, but easily watchable. We kind of needed a work shop for all the belts, oil, blades, safety stakes, cant hooks, you name it. And what to do with our ever growing pile of cedar shingles!
We settled on two full height rolling doors on a doubled up, donated antique track on the drive belt side of the machines (west). To the east, an observation wall just shorter than the height of the planer’s outfeed table, which was coming out very near the sawdust pile. This wall also had three short rolling doors on a single track…we just lift the two small ones off at show time and leave the other hang. Beneath the one rolling door, the observation wall lifts out so we can blow all the planer shavings directly into the sawdust pile. To the south, an 8 x 16 workshop with a bench, vise, spare parts and window had its own rolling, lockable door. The dividing wall between the shingle mill and workshop, we decided, to shingle over with several years’ worth of cedar shingles. Can’t think of a better place for a shingle mill!
This building was built much like the other one, except that with the building being 9 feet tall at the eaves instead of 12’ like the main building, we were able to have an extra work day at my house by assembling the four main frames (9’ x 16’) right on a hay wagon. We had two 31’ foot head timbers ready to go (in two halves, once again joint over a post) and all of the roof rafters roughed out.
They say things go smoother on the second try, and this time we had the four main frames standing in 2 ½ hours, and the eave timbers on shortly after lunch. The main construction of the building went very fast (always a carpenter…you go like heck until the roof is on!) but the detailing on this addition really slowed things down, not to mention the park was now, thankfully, once again at full operating hours which limited us to start times of 3 pm on work days.
A lot of siding, as well as design on the fly of our unique doubled up rolling doors on the west side made for a lot of hand fitting.. Hand nailing on all the cedar shingles, hardware to secure the doors, flashing to the main building (we purposely made this building short enough to squeak under the existing building’s eave). Also have to mention the stamped metal decorative ball on each peak…gotta have those. A little fancy for a sawmill building, but why not?

Reaper after restoration
We didn’t forget about farming while the buildings were going up. MCHS has had a Champion #4 combined reaper/mower in their sheds for decades, and it was time to give it a once over. According to what I have found on-line, this machine was built between 1870 and 1890, when the wood platforms were replaced with metal. The entire apron (part the grain gets swept across) was rotten due to its close proximity to the ground and the fact, at some point, it was wrapped with tin, holding moisture in. That was totally re-built, making all the wood parts wedge shaped just like the original. This shape helped make the apron self-supporting.
The engagement clutch for the rotating arms was wore…when you pulled the finger latch to disengage, it would not separate the clutch dogs far enough and stay to disengage the clutch. I had a small shim TIG welded to the bottom of the lever, and that gave us the extra 1/16” we needed for it to work.
The drive clutch for the mower arm was frozen in the engaged position, which would have been fine if the knife also wasn’t frozen. Pins were pulled to get it on the trailer, and once at my shop, liberal soaking got everything moving again. Pulling it around the yard with a garden tractor got it all moving again, but revealed another problem. The “balls” that bear the weight of the rotating arms all had flat spots on them from being froze up and dragged across the “ramps” that make the arms go up and over the operator. These were removed and Jim Wiesner went to work putting hard weld on these spots and ground new shape into them.
It is said this can be converted from mower to reaper in 30 minutes or less, and while I haven’t done it, I’d say that is true. Four bolts on the sweep arms, one chain on the back, and two bolts on the apron and off it would come. One bolt to remove the newly made “reaper snout” and one different bolt to put the “mowing board” back on. Somehow, all the pieces to convert this thing back and forth stayed with the machine. An easy way to tell if your old mower used to have a reaper attachment is if the sickle is behind the drive wheel axle; most stand-alone mowers the sickle is forward of it.
A change I made to the reaper, mainly due its age and rarity, and because we, as a group, like to use equipment, was the addition of an out-rigger wheel. I was able to find a pulley the right size and weld up a bolt on axle to give support. One of the places where the levelling chains hooks up was already a touch bent from years of load on it, and this wheel will likely add years of life to this machine.
One thing I am looking for yet is a correct seat. A typical implement seat sits parallel with its bracket and doesn’t need to rotate 45 degrees like this reaper does. When mowing, you face straight forward. When reaping, with this machine anyways, you rotate the seat mount 45 degrees away from the reaper arms and the rotate the seat on the mount back 45 degrees so you are still pointing forward, but 10 inches or so away from the reaper arms. In the straight position, you’d get hit on the shoulder. That makes the seat pan having instead of four “dimples” on it to hold it straight, it is supposed to have eight to accommodate this second position. We do not have the original seat, so when you seat on it in “reaper position”, the bump on the seat’s crotch is in a very uncomfortable spot, even on smooth ground. Needless to say, if anyone has a seat for this machine we are certainly interested in acquiring it.
Enough with the small grain, onto corn. Our group heard of a nearby auction in which the farmer was known to hang onto everything. Rick went to go have a day before look and saw a decent McCormick corn binder (actually has “corn harvester” painted on it). Our group like to have our own, stored near the village, equipment that is hard to transport, so if somebody wants to just bring their tractor, we have operating equipment nearby. The club bought it and it was hauled to my shop for a once over. First thing, while looking really good, all the chains were stiff/stuck to the point it wouldn’t roll with the clutch engaged. Before going nuts oiling it up, I pressure washed everything, and prepped and coated all the wood with spar varnish as long everything was clean (no oil drips). Then I sprayed the chains down with penetrating oil, waited a couple of days, and hooked up to my Cub Cadet 127. I like using this garden tractor for this type of thing…as a hydro I can take it easy. Its heavy enough to pull things like this, but light enough it will spin out if the machine won’t turn over, which happened three times with this. After more soaking and flexing of the chains, I was able to get her rolling again.
I have my own grain binder, so I am familiar with the McCormick knotter, but this machine laces up different than anything I have seen before. I called member Ben Rehme over, who has his own McCormick Deering corn binder, and we were able to lace it up and confirm knotter functioned. At the show, Ben had to do some adjusting to the trip arm as things were wore enough it would not tie when a bundle was formed. We were missing a few pieces…a seat, the slide on bracket to mount the seat as well as a tip for one of the “snoots”. Pat Hemken did some digging and came up with a seat. He also found a fellow in Nebraska that provided the two other parts for just the cost of shipping. Tells you “tractor people” are still the best hobbyists around.
Onto hay equipment. MLRI has owned for nearly 15 years a McCormick Deering “push” hay loader. What that means is the style with wooden arms that rotate on a crank shaft and metal fingers that “push” hay up versus an apron style, which has a link chain with wood slats that rotate and conveys the hay up to the wagon. Ours has been sitting in a member’s back yard, and it needed some attention. We extracted it and once again it was brought to my shop (I love fixing up stuff…as long as I don’t have to store it!). Doing an inventory, we were missing quite a few of the spring steel fingers that bolt to the slats and most of the wood arms were shot. Also, one of the trip dogs in the rake assembly must have hit a stone once, as it was bent and did not allow the rake to properly fold back as it rotated. A little heat and beat with the torch took care of that. All new arms were made. A trip back to its former resting place with a metal detector yielded the bulk of the steel fingers and their mounting hardware…the rest we gathered up from wherever we could get them.
Now we have a loader, we also own a rake/tedder, of course we had wagons, and now how do we get hay (for us, straw) into the barn? Why, we need a functional hay trolley loader, of course!

Meeme Livery Stable with hay trolley
Even before MCHS moved the Meeme House (an 1850’s tavern/hotel) and it’s original livery stable to the site a few years back it has always been part of the event having the buildings incorporated into active displays. MCHS’ The Two Creeks Town Hall is site of a kid’s farm auction, the functional print shop makes tractor/farm related prints during the show, the cheese factory actually does make butter and string cheese, there is a working smokehouse and an operating blacksmith shop, to name just a few. The livery stable offered a perfect opportunity for another building to be “brought to life”.
With a Hudson trolley that was donated to us, various members of the community came together to get everything we needed. Randy Meyer salvaged track for us. Sheldon Krueger got the rope. MCHS had all the pulleys (as well as the building!) Blacksmith Eugene Durban forge bent all the “C” shaped flat bar hangers, John Drumm the drop pulley.
Since the livery stable is relatively short, a couple of my sons and I put up scaffolding on the outside to do the rigging required to get the track overhanging outside enough to be functional…this included a chain going to the roof peak. The livery stable already had hay mow doors on the gable end, so we just needed to make a weather proof, easily re-movable access for the trolley to come outside when we wanted to use it. [ picture 14 ] I wanted to use a chain so when/if we ever needed to service or homemade trip shoe (the one part of this whole rig we had to make and are still looking for an original one) we could just disconnect track from the inside on a 8’ ladder and pull the track inside w/o having to re-erect scaffolding. Once inside, since the hay loft is short in height, it was pretty easy to set everything up. Through bolting the pulleys through the stable’s 12” timbers was the hardest part other than the above mentioned trip shoe.
There can be a problem with hay trolleys…when the rope fails, the drop pulley can drop over top of concrete and break, so there are fewer of these around than trolleys; and most are matching pairs. Most people who display trolleys only need a length or two of track, which can be hard to get down if it is way up in a barn or buried underneath a collapsed one. What I call the trip shoe is directly above where you load the wagon and slides onto the track and are either rusted on bad enough you don’t want to mess with it or it is hanging outside for outdoor loading, an even worse spot to try and get. We didn’t have one for our trolley.

I spotted one on a barn and took a picture of it from the ground to blow it up to see its shape. Pat and I, through trial and error, were able to make a “functional most of the time” shoe. Since it’s outside in the weather all year, the shoe gets a little rusty and needs to be “worked in” prior to show time to get trolley to lock and drop the pulley like it should. Either way, it works. Our first time in 2020 when we operated this with a tractor, did we ever have a crowd watching this. I emceed what was going on a why, and did we ever get compliments on this. A lot of people have seen these in a barn before, but very few are around in our area that has seen one operate. It was a very gratifying afternoon.
With our field work, sawing, building and restoring, we are a smaller club that gets a lot done. I’ve been “lucky” enough to be taking care of all of our planting, which isn’t bad as long we have a couple of guys come and plow it up and disk it for me first. Then I just need to run it over with the spring tooth and plant. I was fortunate two years ago when we turned over our north field right after the show and I still had my Oil Pull M there. Since my half-ton Ford can’t pull it, I always drive it the 6 miles to the Village, always pulling something or another there and back. I was able to put her to work on an eight foot double disk, and while not a big load for the tractor, the hills are plenty steep enough to make her grunt, but not enough to turn on water injector. So I disked that 4 acres once and road “ran” (more like slow stroll) home. Those 5 ½ hours of operating I burned less than 5 gallons of fuel. If you look in the Nebraska test book, this model Oil Pull is ranked second for fuel economy on kerosene, and now I truly believe it!
One last thing, of course we plant the “old way” with vintage equipment. This Fall, for planting our winter wheat, I rotated my 1948 Farmall into the mix (I work a different tractor every year to keep them limbered up) and used my 1950ish Case Model D grain drill. We plant 120 lbs to the acre. That is heavy, and on the hilly field we rotated into this year means it only lets us use the power take off binder, but we have found that this chokes out the weeds enough that it eliminates a kill spray two weeks before we binder, which is usually the last weekend of July. So we spend more money one way, and save some the other. Just to top things off, I had to pick up the seed with my latest find, a 1950 International L-112 pick-up truck so I could get all angles of vintage planting covered. My dad had a 1954 Ford F-100 when my siblings and I were small, and when he’d go to work, he’d drop us off at school, two in the cab, two in the box, so there is some nostalgia involved with this buy. It is in good enough shape to be a recreational daily driver, but, like everything else, it has a laundry list of items I am going to take care of, but a repaint is not one of them.
Somethings just look better old.